How I Set Up a Sound Treatment for My Home Studio.
How I Set Up a Sound Treatment for My Home Studio
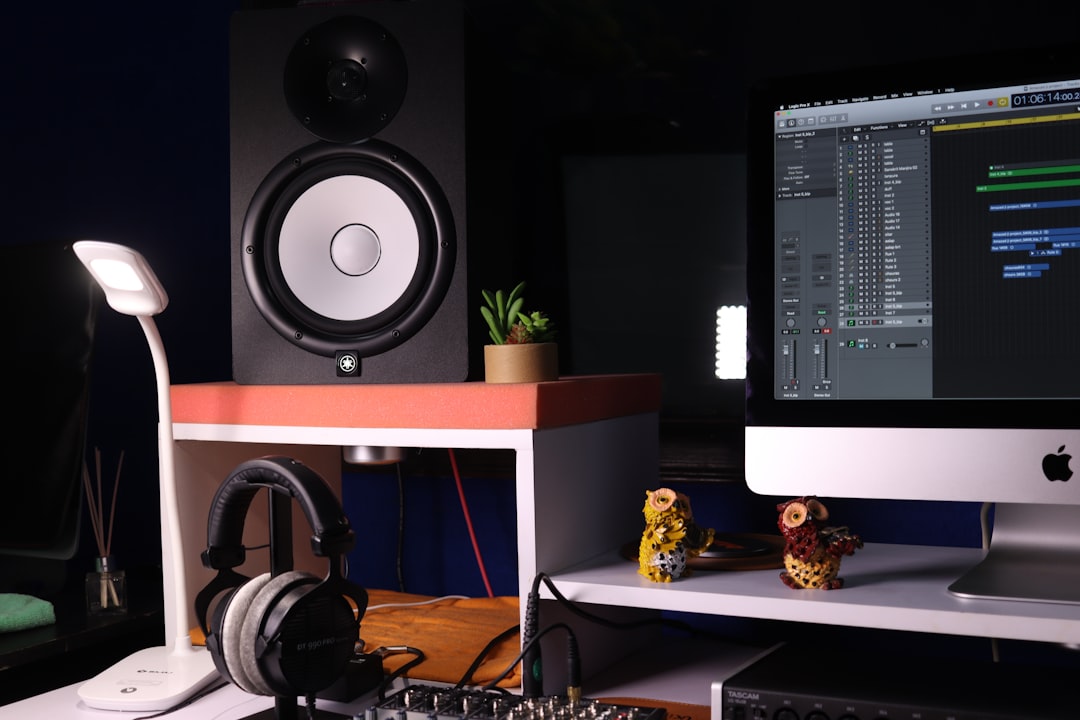
Every aspiring music producer, podcaster, or voiceover artist eventually hits a wall – not a literal wall, but an acoustic one. That moment when you realize your expensive microphone and top-tier interface are being undermined by the very room you’re recording in. For me, that moment came after countless frustrating mixes and recordings that sounded muddy, boomy, or just plain unprofessional. My home studio, a spare bedroom, was a sonic nightmare: reflections bouncing everywhere, standing waves creating weird resonances, and a general lack of clarity that made critical listening impossible. This isn’t a guide based on theory alone; this is my personal journey, step-by-step, on how I transformed that acoustically challenging space into a functional, great-sounding home studio.
My Initial Encounter with the Echo Chamber: Realizing the Problem
Before I even thought about specific treatments, I had to truly understand the problem. My studio space is roughly 12×10 feet with 8-foot ceilings, a typical rectangular room. It had hardwood floors, bare walls, and a window – a perfect recipe for a reverberant, echo-filled environment. My early recordings, especially vocals, sounded like they were done in a bathroom, full of flutter echoes and unwanted reflections. When mixing, the bass response was wildly inconsistent depending on where I sat, and stereo imaging felt smeared. I knew understanding room acoustics was paramount, but the sheer amount of information out there felt overwhelming. My first step wasn’t buying anything, but simply listening critically and identifying the most egregious issues. I clapped my hands, walked around, and listened to how sound decayed. It was clear: I had too much reverb, especially in the mid-high frequencies, and a serious problem with bass buildup in the corners.
From Frustration to Research: Understanding My Room’s Flaws
My initial frustration fueled a deep dive into online forums, articles, and YouTube videos. I learned about key concepts like early reflections, reverb time (RT60), standing waves, and room modes. It quickly became apparent that soundproofing (preventing sound from entering or leaving the room) was different from sound treatment (improving the sound *within* the room). My goal was the latter. I needed to absorb unwanted reflections, tame bass frequencies, and introduce some diffusion to maintain a lively, natural sound without sacrificing accuracy. I also learned that every room is unique, and a one-size-fits-all approach wouldn’t cut it for my specific space. This personal assessment phase, though daunting, was crucial for setting the right path.
Mapping My Sonic Landscape: Identifying Problem Frequencies and Reflection Points
This was the most eye-opening part of my journey. Instead of just guessing, I decided to take a scientific approach. I invested in a simple measurement microphone (a Behringer ECM8000, which is affordable and effective for this purpose) and downloaded the free Room EQ Wizard (REW) software. This combination allowed me to measure my room’s frequency response and waterfall plots, revealing exactly where my biggest acoustic problems lay. It showed me glaring peaks and dips in the bass frequencies, confirming my suspicions about standing waves, and also highlighted the longer decay times in the mid-high range.
The Mirror Trick and Speaker Placement: Pinpointing Early Reflections
Beyond the software, I used the classic “mirror trick” to identify primary reflection points. With my studio monitors playing, I had a friend move a mirror along the walls and ceiling while I sat in my mixing position. Wherever I could see a speaker in the mirror, that was a first reflection point that needed absorption. These points were critical: the side walls, the ceiling directly above my head, and the wall behind my monitors. I also spent considerable time experimenting with speaker and listening position. Moving my desk even a foot or two made a noticeable difference in bass response, as did adjusting the toe-in of my monitors. This hands-on, iterative process of listening and testing was invaluable.
Crafting My Acoustic Arsenal: Choosing and Building Treatment Elements
With a clear understanding of my room’s issues, it was time to select the right tools. I decided on a combination of absorption and bass trapping, with a little diffusion planned for later. Given my budget and a DIY inclination, I opted to build most of my acoustic panels and bass traps myself. This wasn’t just about saving money; it gave me control over the materials and aesthetics.

DIY Absorption Panels: My Go-To Solution for Mid-High Frequencies
For the absorption panels, I chose Rockwool Safe’n’Sound mineral wool insulation. It’s affordable, has excellent absorption coefficients, and is relatively safe to work with (though I always wore gloves, a mask, and long sleeves). I built simple wooden frames (1×4 lumber) for each panel, typically 2×4 feet and 4 inches deep to accommodate the insulation. I then wrapped them in breathable fabric, choosing a color that blended with my room’s decor. I made about six of these panels for the first reflection points and the wall behind my listening position.
Taming the Low End: My Experience with Bass Traps
Bass frequencies are notoriously difficult to control, and they tend to build up in corners. For this, I knew I needed dedicated bass traps. I constructed four corner bass traps, each 2 feet wide and 4 feet tall, designed to sit floor-to-ceiling in the vertical corners. These were essentially larger, deeper versions of my absorption panels, filled with a thicker layer of mineral wool (6-8 inches deep) and angled to fit snugly into the corners. The deeper the trap, the lower the frequencies it can absorb, making them crucial for tackling those problematic room modes. I also experimented with placing a couple of these horizontally at the wall-ceiling junction, which further helped to even out the bass response.
Considering Diffusion (and why I waited)
While absorption is vital for taming reflections, too much can make a room sound “dead” and unnatural. Diffusion helps scatter sound waves, preserving the room’s natural ambiance while preventing flutter echoes. I initially considered building Quadratic Residue Diffusers (QRDs) but decided to hold off. My priority was getting the absorption and bass trapping right first. A well-treated room with good absorption can still sound great, and I wanted to ensure I wasn’t over-treating or introducing unnecessary complexity. My plan was to add diffusers later, perhaps on the rear wall, if the room still felt too “dry” after the initial absorption setup. For now, a large bookshelf on my back wall served as a rudimentary diffuser, breaking up reflections with its varying depths.
The Strategic Placement: Where My Panels Found Their Home
Installation wasn’t just about screwing panels into walls; it was a methodical process guided by my earlier measurements and the mirror trick. Each piece of treatment had a specific purpose.
First Reflection Points: The Immediate Impact
My first priority was the early reflection points on the side walls. Placing 4-inch thick absorption panels here immediately reduced the harshness and comb filtering I was experiencing. The stereo image instantly became clearer, and sounds felt more localized. I mounted these panels using French cleats, allowing them to be easily moved or adjusted if needed. The ceiling panel, placed directly above my listening position, made an equally significant difference, eliminating overhead reflections that contributed to a sense of “smear” in the mix.
Corner Bass Traps: The Foundation of My Low End
The bass traps went into all four vertical corners of my room, stacked floor to ceiling. This was the most impactful step for low-end control. The REW measurements after installation showed a dramatic flattening of the frequency response below 200


Post Comment