The Best Practices I Follow for Recording Clear Vocals.
Recording truly clear vocals isn’t just about owning expensive gear; it’s a meticulous blend of preparation, technique, and a deep understanding of your environment. Over the years, I’ve honed a set of practices that consistently deliver pristine vocal tracks, forming the backbone of every successful project I undertake. It’s a holistic approach, where every detail, from the acoustics of the room to the singer’s hydration, plays a crucial role in capturing that elusive, crystal-clear sound. If you’ve ever struggled with muddy, noisy, or thin-sounding vocals, you’re in the right place. I’m going to share the exact methods I employ to ensure every vocal take shines with clarity and presence.
My Sanctuary of Silence: The Pre-Recording Environment I Cultivate
Before any microphone even leaves its case, my absolute first priority is the recording environment. You can have the best microphone in the world, but if your room sounds bad, your vocals will sound bad. My practice is to create as much of a “dead” and silent space as possible. This doesn’t necessarily mean a professional vocal booth – often, it’s about being resourceful and understanding how sound behaves.
Taming the Room’s Echoes and Reflections for Pure Tones
- Strategic Acoustic Treatment: I don’t just randomly stick foam on walls. I identify primary reflection points (where sound from the vocalist hits a surface and bounces back into the mic) and address them. This usually means placing absorption panels behind the singer, in front of them (if it doesn’t obstruct the performance), and on side walls. For instance, imagine a straight line from the singer’s mouth to the microphone, then extend that line to the nearest wall – that’s a key reflection point. Blankets, duvets, or even portable gobos (go-betweens) can work wonders in a home setup, especially when hung a few inches off the wall to maximize their effectiveness. The goal is to minimize flutter echoes and excessive reverb that can muddy a vocal, making it sound distant or unfocused. For a deeper dive into the principles, understanding acoustic treatment is essential.
- Corner Bass Traps: Even for vocals, managing low-end build-up in corners is important. While less critical than for instruments with heavy bass, uncontrolled low frequencies can still contribute to a boomy, unclear sound, especially if the microphone has a pronounced proximity effect or the vocalist has a deep voice. Simple DIY bass traps can be made from rockwool or Owens Corning 703 rigid fiberglass.
- The “Quiet” Test: Before hitting record, I always perform a “quiet test.” I’ll stand in the recording spot, listen intently for any ambient noise, and then record about 30 seconds of pure room tone. Listening back to this helps me identify subtle hums, computer fan noise, air conditioning, or even distant traffic that I might not have noticed during setup. This recording of the “noise floor” is also incredibly useful for noise reduction plugins later, should you need them. Addressing these before recording is infinitely easier than trying to remove them later.
Eliminating Unwanted Noise Sources: My Battle Against Sonic Intrusions
- Computer Placement: My computer, with its noisy fans, is always moved as far away from the microphone as possible, ideally in another room or behind a sound barrier. If that’s not feasible, I’ll use a laptop with minimal fan noise, ensure my desktop has quiet components, or even build an isolation box for the tower. Every decibel of ambient noise you eliminate at the source is a victory for clarity.
- HVAC Systems: I make sure to turn off any heating, ventilation, or air conditioning systems during takes. Even a low hum can be surprisingly prominent in a sensitive condenser microphone, and trying to gate it out later can lead to an unnatural, pumping sound.
- External Disturbances: I communicate with others in the house to minimize noise, close windows to block street sounds, and choose recording times when the environment is naturally quieter. Sometimes, recording late at night or early in the morning can make a huge difference in urban environments. Remember, the microphone hears everything.
- Electrical Interference: I also check for ground hums or buzzes caused by faulty cables or power outlets. Using balanced XLR cables and ensuring proper grounding for all equipment can prevent a lot of headaches.
The Vocalist’s Matchmaker: My Strategy for Microphone Selection and Placement
Once the room is ready, the next critical step is selecting and positioning the microphone. This isn’t a one-size-fits-all approach; it’s about finding the best combination for the specific vocalist and song. A deep understanding of different microphone types and their characteristics is key here. For guidance on specific models, choosing the right microphone can provide excellent starting points.
Pairing the Performer with the Perfect Pickup: My Microphone Philosophy
- Condenser vs. Dynamic vs. Ribbon:
- Large-Diaphragm Condensers: These are my go-to for most studio vocals. They offer incredible detail, a wide frequency response, and high sensitivity, capturing the subtle nuances of a performance. They excel with softer, more intricate vocals but can sometimes be too revealing of room noise.
- Small-Diaphragm Condensers: While less common for lead vocals, they can be excellent for backing vocals or specific vocal textures where a very fast transient response and accurate high-frequency capture are desired.
- Dynamic Microphones: Robust and less sensitive, dynamics like the Shure SM7B (often used for podcasts and rock vocals) or the legendary SM58 can be fantastic for loud, aggressive vocals or in less-than-ideal acoustic environments. They naturally reject more room noise and handle high SPLs (Sound Pressure Levels) well, providing a focused, punchy sound.
- Ribbon Microphones: Known for their warm, smooth, and natural sound, ribbon mics can be magical on harsh or sibilant voices. Their figure-8 polar pattern also offers unique acoustic possibilities, though they are often more fragile and require a good preamp.
- Considering the Vocalist’s Voice: Does the singer have a naturally bright voice, or is it prone to sibilance? A warmer mic might be better. Is their voice thin? A mic with a strong low-mid presence could add body. I often try a few different microphones if available, letting the singer perform a short passage with each, then listen back critically. The “best” mic isn’t always the most expensive; it’s the one that complements the vocalist’s unique timbre.
The Art of Microphone Positioning: Finding the Sweet Spot
- Distance is Key: For most lead vocals, I start with the singer about 6-12 inches (15-30 cm) from the microphone. Closer distances increase the proximity effect (boosted low frequencies), which can add warmth and intimacy but can also lead to muddiness if overdone. Further distances reduce proximity effect and capture more room sound, which might be desirable for a more natural, ambient feel, but risks losing intimacy and clarity. Experimentation is crucial here, as different mics and voices react differently.
- Off-Axis Positioning: To combat harsh sibilance or plosives without a pop filter (though I always use one), I sometimes angle the microphone slightly off-axis, so the singer is singing past the capsule rather than directly into it. This can gently roll off harsh high frequencies.
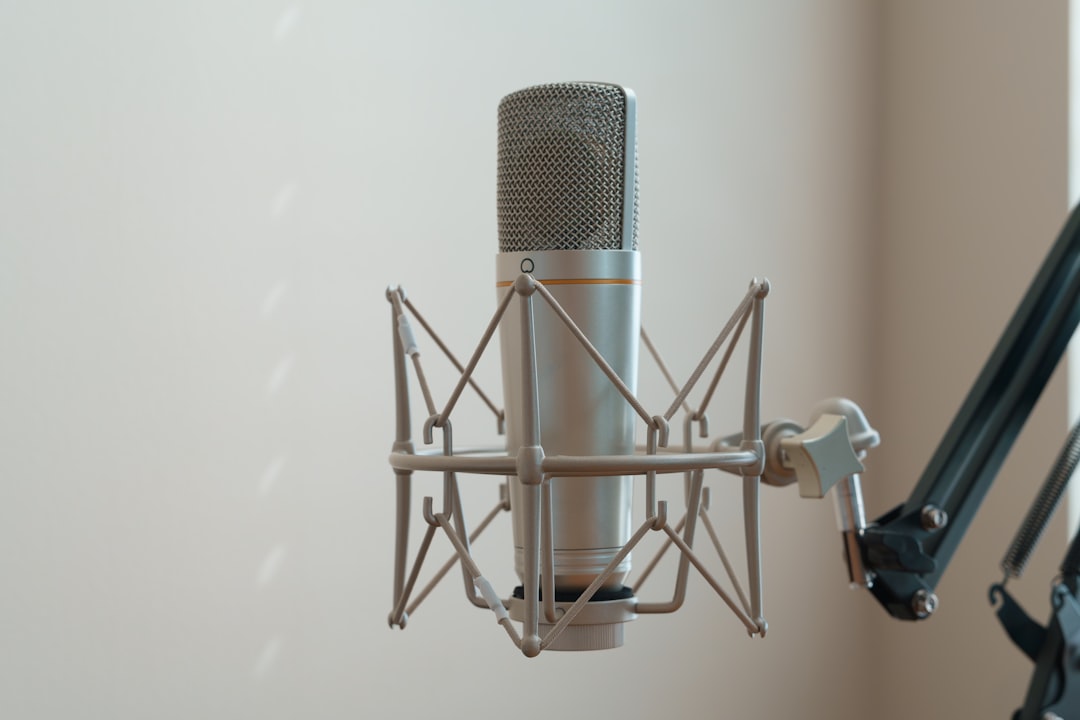
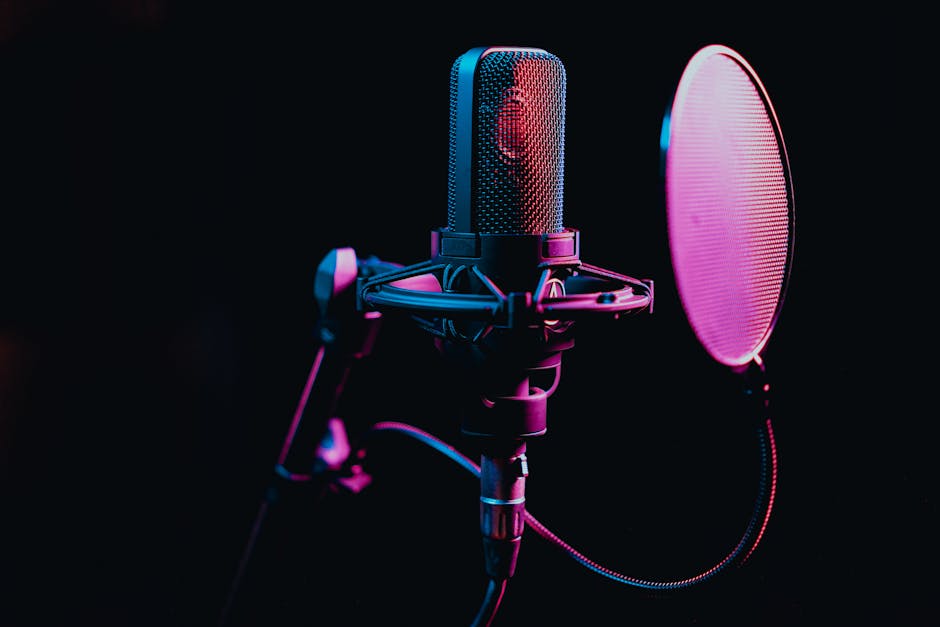
- Pop Filters: Absolutely non-negotiable. A good pop filter (preferably metal mesh or a high-quality fabric one) prevents plosives (P and B sounds) from overloading the microphone capsule and protects the mic from moisture. It also helps maintain a consistent distance from the mic.
- Shock Mounts: Essential for isolating the microphone from vibrations transmitted through the stand – footsteps, bumps, even subtle movements in the floor can be picked up. A good shock mount ensures only the vocal performance is captured.
- Microphone Technique: I’ll often coach the singer on mic technique. This includes maintaining a consistent distance, learning to “work the mic” (moving slightly closer for soft passages, backing off for loud ones), and understanding how to breathe quietly. For more detailed techniques, Shure’s guide on microphone technique is an excellent resource.


Post Comment